
Saturday, September 29, 2012
Thursday, September 27, 2012
Some ideas for your Flame Painter and Scribbler projects
I just saw this guy's work and it made me think that you could do something aesthetically similar by combining images from Flame Painter, Scribbler, and your photos in Pixlr.

Wednesday, September 26, 2012
Typology Assignment
Assignment 1: Typology
This week, you will be learn about Typologies which are the study of types. You will shoot a series of photographs with the intent of creating your own typology this week.
You will edit your photos using Pixlr.com. I would like you to start by adjusting the tone and image of each image using the Levels tool. It is very important that they are all color correct.
Levels is a very powerful tool that can be used to adjust the tones (brightness values) of an image. Levels relies on you having a basic understanding of a histogram. For that reason, I would like you start by reading this tutorial on histograms. Then, read this tutorial on using Levels. It is written for Photoshop, but the big concepts are applicable to Phoenix (and all image editors for that matter), there are just less options. Here is another good tutorial on using Levels with Photoshop. Pixlr doesn't support the Alt/Option key trick mentioned in that tutorial. Phoenix basically offers a simplified version of Levels shown in the image below. This menu is found by going to Adjustments > Levels.
Basically, you want to move the left most slider to where the data in the histogram starts to climb. This will make set the darkest part of your image; the black point. You want to move the right slider to where the histograms starts to climb as well. This will set the brightest part of your image; the white point. By moving these point to where the data begins, you are expanding the limited tonal range of your image to make full use of the tonal range available. If the data is already spread across the full tonal range, then you don't need to move the sliders. You would still want to adjust the middle slider to change the midtones, the middle brightness values, to taste.
So, for each image adjust the black point, white point, and midtones.
If you are not sure, you can always hit the Auto Levels button to see how that works for you. Sometimes, it works great and other times not so great.
Next, you will crop the images down to squares. You want the framing of each image to be as uniform as possible. To get a perfect square, you have to change the Aspect Ration to 1:1 in the Options menu once the Crop tool has been selected. You can then re-position the selection if you like. Then, to crop to the area selected, hit Return/Enter.
Next, you need to down sample each image. Down sampling is a type of interpolation (re-sizing) in which the total number of pixels is reduced to create a smaller file. You are going to down sample these images because you need to fit 4 across and the maximum file size is only 4000 in one direction.
So, you are going to crop each image to a set amount of pixels. Given that you will have a grid of 4x4 images with a space between each and the edge of the frame, this will allow for X pixels between each image and from the border.
So, it will be X pixels border + X00 pixels image + X0 pixels border + X00 pixels image + X0 pixels border + X00 pixels image + X0 pixels border + X00 pixels image + X0 pixels border for a total of 4000 pixels across.
Go to Image > Image Resize and put in X00 for the first field. This will result in the second field automatically changing to X00 as long as you cropped to a square. The image above shows how the dialog box will look.
This will start a process in which it will allow you to download the file in the format of your choice. I would suggest that you use PNG. Be sure to name it something descriptive. Then go to the next image by going to File > New Document. You will get the following warning:
Are you sure you want to create a new document and discard all changes?
As long as you already exported it, choose Yes. Choose Load Existing File to open up the next individual image. Do this for all 16 images before moving on to assemble the grid.
THE REST OF THIS DOCUMENT STILL BE UPDATED - it currently refers to a different program....
To create a new image that will become our grid, go to File > New Document. You will get the following warning:
Are you sure you want to create a new document and discard all changes?
As long as you save it, choose Yes. Then select Start from Scratch.
Shown above, is the New Document dialog. Set the dimensions to 4000 x 4000 pixels which is the largest size that Pixlr supports. You can easily change the color of this background at any point. Depending on what your images are of, you may want to select a color other than white for your background.
To bring an individual image into the Grid image as a layer go to File > Import File. Select one of the cleaned up images from the Aviary Library.
Move this image into position using the Move tool. Unfortunately, Phoenix doesn't have a provision to create a grid for positioning, so you will have to use the rulers to insure correct position. Be sure to keep 80 pixels away from the edges and other images. NOTE: Sometimes it isn't clear how to apply a move. If you move a layer and then want it to stay there, you may need to click on another tool and then back to the Move tool.
Repeat this process until the grid is complete. Name it Grid. Export the completed grid as a PNG file then post it on your blog.
Drawing from this project and our class room discussions, consider the following:
This week, you will be learn about Typologies which are the study of types. You will shoot a series of photographs with the intent of creating your own typology this week.
This
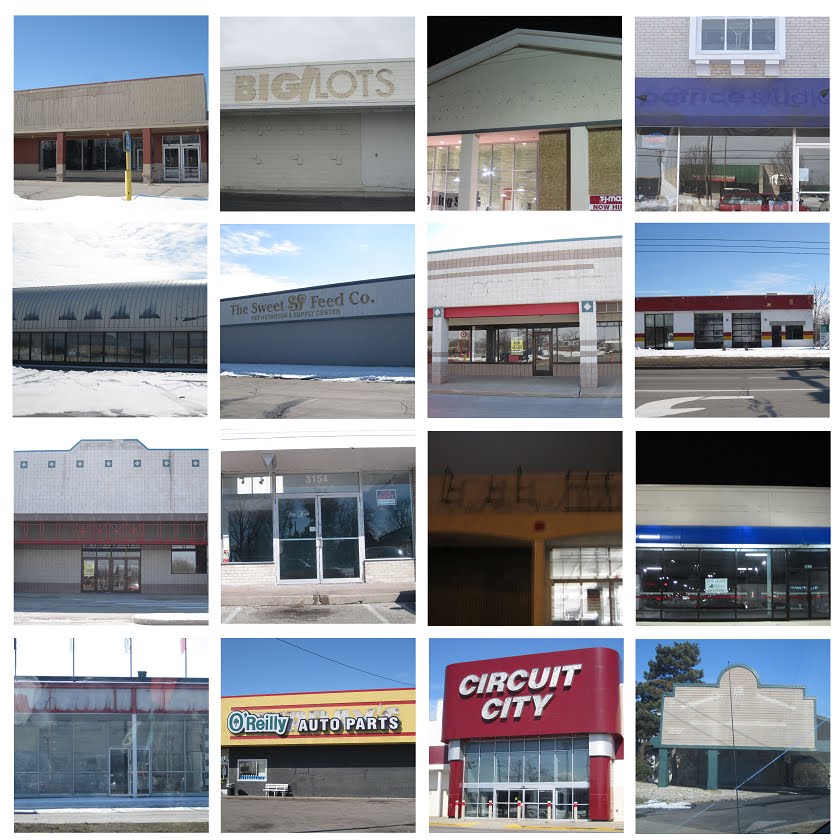
assignment is inspired by the work of Hilla and Bernd Becher’s
typologies. They photographed industrial sites from the same vantage
point and assembled a grid of the resulting images. These are commonly
referred to as Becher Grids. Please read the following articles to get a
sense of their work and background:
A nice selection of images by the Bechers on Artnet
Nice collection of Contemporary Typologies
High precision industrial age souvenirs Bernd and Hilla Becher
"The Photographic Comportment of Bernd and Hilla Becher" (BLAKE STIMSON) 2004
MOMA exhibit - Bernd and Hilla Becher: Landscape/Typology
Exactitudes Series of dress codes typologies
Here are some student examples from the Spring 2010 semester:
Mike Nelson
Susan Mitchell
Pat Culkowski
Dawn Marie Snell
Begin by photographing a series of things which are similar yet
different along the lines of the Bechers' grids. Then, you will use
Aviary to edit the images and create a grid. Basically, you are
exploring the subtle differences between similar objects/subjects. For
this assignment, you are going to create a grid of your photos and host
it on your blog. A nice selection of images by the Bechers on Artnet
Nice collection of Contemporary Typologies
High precision industrial age souvenirs Bernd and Hilla Becher
"The Photographic Comportment of Bernd and Hilla Becher" (BLAKE STIMSON) 2004
MOMA exhibit - Bernd and Hilla Becher: Landscape/Typology
Exactitudes Series of dress codes typologies
Here are some student examples from the Spring 2010 semester:
Mike Nelson
Susan Mitchell
Pat Culkowski
Dawn Marie Snell
You will edit your photos using Pixlr.com. I would like you to start by adjusting the tone and image of each image using the Levels tool. It is very important that they are all color correct.
Levels is a very powerful tool that can be used to adjust the tones (brightness values) of an image. Levels relies on you having a basic understanding of a histogram. For that reason, I would like you start by reading this tutorial on histograms. Then, read this tutorial on using Levels. It is written for Photoshop, but the big concepts are applicable to Phoenix (and all image editors for that matter), there are just less options. Here is another good tutorial on using Levels with Photoshop. Pixlr doesn't support the Alt/Option key trick mentioned in that tutorial. Phoenix basically offers a simplified version of Levels shown in the image below. This menu is found by going to Adjustments > Levels.
Basically, you want to move the left most slider to where the data in the histogram starts to climb. This will make set the darkest part of your image; the black point. You want to move the right slider to where the histograms starts to climb as well. This will set the brightest part of your image; the white point. By moving these point to where the data begins, you are expanding the limited tonal range of your image to make full use of the tonal range available. If the data is already spread across the full tonal range, then you don't need to move the sliders. You would still want to adjust the middle slider to change the midtones, the middle brightness values, to taste.
So, for each image adjust the black point, white point, and midtones.
If you are not sure, you can always hit the Auto Levels button to see how that works for you. Sometimes, it works great and other times not so great.
Next, you will crop the images down to squares. You want the framing of each image to be as uniform as possible. To get a perfect square, you have to change the Aspect Ration to 1:1 in the Options menu once the Crop tool has been selected. You can then re-position the selection if you like. Then, to crop to the area selected, hit Return/Enter.
Next, you need to down sample each image. Down sampling is a type of interpolation (re-sizing) in which the total number of pixels is reduced to create a smaller file. You are going to down sample these images because you need to fit 4 across and the maximum file size is only 4000 in one direction.
So, you are going to crop each image to a set amount of pixels. Given that you will have a grid of 4x4 images with a space between each and the edge of the frame, this will allow for X pixels between each image and from the border.
So, it will be X pixels border + X00 pixels image + X0 pixels border + X00 pixels image + X0 pixels border + X00 pixels image + X0 pixels border + X00 pixels image + X0 pixels border for a total of 4000 pixels across.
Go to Image > Image Resize and put in X00 for the first field. This will result in the second field automatically changing to X00 as long as you cropped to a square. The image above shows how the dialog box will look.
This will start a process in which it will allow you to download the file in the format of your choice. I would suggest that you use PNG. Be sure to name it something descriptive. Then go to the next image by going to File > New Document. You will get the following warning:
Are you sure you want to create a new document and discard all changes?
As long as you already exported it, choose Yes. Choose Load Existing File to open up the next individual image. Do this for all 16 images before moving on to assemble the grid.
THE REST OF THIS DOCUMENT STILL BE UPDATED - it currently refers to a different program....
To create a new image that will become our grid, go to File > New Document. You will get the following warning:
Are you sure you want to create a new document and discard all changes?
As long as you save it, choose Yes. Then select Start from Scratch.
Shown above, is the New Document dialog. Set the dimensions to 4000 x 4000 pixels which is the largest size that Pixlr supports. You can easily change the color of this background at any point. Depending on what your images are of, you may want to select a color other than white for your background.
To bring an individual image into the Grid image as a layer go to File > Import File. Select one of the cleaned up images from the Aviary Library.
Move this image into position using the Move tool. Unfortunately, Phoenix doesn't have a provision to create a grid for positioning, so you will have to use the rulers to insure correct position. Be sure to keep 80 pixels away from the edges and other images. NOTE: Sometimes it isn't clear how to apply a move. If you move a layer and then want it to stay there, you may need to click on another tool and then back to the Move tool.
Repeat this process until the grid is complete. Name it Grid. Export the completed grid as a PNG file then post it on your blog.
Drawing from this project and our class room discussions, consider the following:
- What is the largest high quality, photo-realistic print that we can make from the completed grid? Explain your answer.
- After the image is hosted on your blog, it appears small within the body of the blog, but opens up larger in a separate window when clicked on. What is the pixel dimension of the larger version? If it differs from 2800x2800, why would that be?
- It is convention that 72ppi are need for screed display. That is to say, if you wanted your image to appear as approximately 2 inches by 2 inches on screen, you would size your image to be 144 x 144 pixels. How large of a print would an image of that size make? Why do you need higher resolution when you print than for use on screen?
- Let's imagine you want to make a new Google Docs or PowerPoint presentation. You decide that the images don't need to be larger than 6 inches across for on screen use. How many pixels wide should your images be for this application?
- What is DPI? What is it an acronym for? Is it the same thing as PPI? If not, what are the


Friday, September 21, 2012
3D papercraft
Krista Hoefle makes full scale figures from paper. She used Pepakura for some of her work. Here other work is pretty cool as well.
Collection of nice papercraft
Singapore University project in which they upcycle materials into 3D models
WebUrbanist collection of nice papercraft
Eric Testroete has a neat paper head
This photogallery reveals his process
Papercraft Museum - self explanatory, also has some good information there
Forum Thread about a guy making a full scale paper outfit
Osang Gwon's photo sculptures
Pepakura
A guy's tutorial on creating a large head
Erik's Models has some good resources to get starting making your own paper models
Blog dedicated to Papercraft using Pepakura. He offers lots of free model files.
Bert Simons papersculpture
Nice collection of images of Bert Simons paper sculptures.
How to reduce the poly count using Blender
Example video of reduced 123D model using Blender
3d Photo references and downloadable textures
Review of Looxis Faceworx as well as a link to download the program
How to use Looxis Faceworx
This video explains how to reduce the poly count using Blender
Texture model from photographs
Great video showing how it's done using ZBrush
Similar video
Wednesday, September 19, 2012
Song should be hosted on your blog before class on Monday
We will be listening to all your songs in class on Monday.
The song is due on your blog before class begins on Monday.
First you need to create the MP3 version of your song. Within Garageband, go to Share > Export Song to Disk. Select MP3 as the desired format. Select High Quality for Audio Settings. Export it. Be sure to note where you saved it to.

If you are using Tumblr, you can your MP3 directly by selecting the new Audio post button. It will put your song in a nice little MP3 player for you. If you are using Blogger, then I suggest that you use Soundcloud to host your finished MP3 files.
Use the embed code to have the song appear in a nice player interface directly on your blog.
Here is little photos step by step on using SoundCloud. Essentially, after you upload and save your file, you click on the Share icon on the player and copy the embed code from there. Then paste it into the HTML section of your blog.


Here is an example of a SoundCloud hosted MP3.
What is Autotune? How to do it in Garageband.
Jay-Z's Death of Autotune
***FYI- Explicit & Potentially Offensive Lyrics***
Jay-Z's Autotuned/Remixed Jay-Z's 99 Problems "99 Problems But My Pitch is One"
***FYI- Explicit & Potentially Offensive Lyrics***
Tuesday, September 18, 2012

Monday, September 17, 2012
Some tutorials on using Pixlr Layer Masks
Open two images up. Select All on one of them. Copy it. Go to the other image. Paste it. Create a layermask. Use the Paint Tool to paint things back in.
Alternatively, you can first make a selection then create a layer mask.
Remember, the Paint Brush allows you to paint visibility. The Eraser Tool allows you to paint invisibility.
Wednesday, September 12, 2012
GarageBand
What is Garageband?
Start here with these GarageBand Video tutorials
How to write a song using GarageBand loops.
Start here with these GarageBand Video tutorials
How to write a song using GarageBand loops.
Macloops free, large collection of free loops - you must register to download loops
NIN Remix - download complete NIN songs in Garageband format for reverse engineering and remix purposes
Notes on Songwriting - nice write up on the creative process and a breakdown of building a song (includes definitions of basic parts of a song)
A recipe approach to making a song in Garageband - start here if you are overwhelmed or don't know what to do
A recipe approach to making a song in Garageband - start here if you are overwhelmed or don't know what to do
Monday, September 10, 2012
Digital Audio Assignment
Learning Activities, Part I:
Introduction to Digital Audio
MP3
is considered the most popular music format, but has many drawbacks in
comparison to other digital formats. Given that digital music is the
future (if not the present) platform for listening and distribution, it
is important to understand the differences between the myriad of
choices.
Since many of you may already have some
experience using iTunes, this assignment has been written for iTunes
users. iTunes is available as a free download for both Mac and PC
computers, and the software is installed on most of the Mac computers on
main campus. The core information in this module, however, is
applicable to all digital music programs; therefore, you may use any program you want
to complete this assignment. All PCs come with Windows Media Player - a
software which functions similarly to iTunes. And with a little
digging, you will find that there is no shortage of free conversion,
organization, and ripping software available for your use.
To get started, I would like for you to view this Apple tutorial on Digital Music Basics. You
may find that the article is a little one sided when it comes to
products, but the information contained within is still valid. Next,
watch this short video on the basics of importing a CD (a process often referred to as "ripping a CD"). Then, review this brief summary of importing with iTunes. Finally, read these excerpts from the iTunes Help Section to learn the differences between various file formats, and how to select them when importing.
NOTE:
If you launch iTunes and then insert a CD into your CD/DVD drive,
iTunes will detect the CD, find the album and song information from an
online database, and then present you with a list of import options. If
you say OK and import the CD, the songs will be imported as AAC files. In the lower right corner of the window, you will see an Import CD button and an Import Settings button. You can use the Import Settings button to change the settings used to import the CD.
By Thursday at 11:59 PM:
For the first part of your assignment, I would like to rip the same song from a CD using four different file formats:
- an AAC file using iTunes default setting
- an MP3 with the preset of Higher Quality (192kps)
- an MP3 with the preset of Good Quality (128kps)
- an AIFF file.
- an MP3 created by stripping the audio from a YouTube video. Go to www.youtube-mp3.org and past the URL for your selected video into the field. Download the MP3. Drag it iTunes to import it.
- What are AAC, MP3, and AIFF? How do they differ?
- List the files sizes of the 4 different versions you ripped.
- Could you hear any difference between the four files? Explain these differences in greater detail. How did the sound quality vary from one version to the next?
- If you wanted to rip all of your CDs to your computer so that you could trade them in, what file format would you choose and why?
Section 001 student blogs
Ben
http://bombthestreetz.blogspot.com/
diazdelosmuertosart.com
Kayla
http://kdvintage.blogspot.com/
www.kayladopfer.com
Michelle
http://fashionstealsintodeals.blogspot.com/
Taryn
Tarynorick.tumblr.com
Derek
http://indiegamingnews.tumblr.com/
Brooke
http://breakthroughart.tumblr.com/
http://deed-a-day.tumblr.com/
Ayeesha
http://fashionablegijinkacosplay.tumblr.com/
Megan
sleepwouldbenice.blogspot.com
Thomas
vivartium.blogspot.com
Hao De Cui (Alvin)
cuihaode.blogspot.com
Corrine Moore
?
thelustofplus.blogspot.com
Megan G
writteninstar.blogspot.com
Chelsea
???
softballdabomb.blogspot.com
Marli
beautifulahead.blogspot.com
Alexa
alexazmuda.tumblr.com
Jared
hollywoodnightlife.tumblr.com
George
?
zombieacid.blogspot.com
Katie
??
cleanandneat.blogspot.com
collegetruthsandlies.blogspot.com
Wednesday, September 5, 2012
Notes for class Wednesday 9/5
Any problems using Levels?
Introduce color correction in Pixlr using Levels
Introduce Flickrslideshow
Embed a Flickr Slideshow into your blog featuring your edited Urban Landscape images
Animoto
Working with layers in Pixlr
**To save your file so that it preserves layers, you must save it as a PXD file**
Homework:
1. Bring a CD and the best headphones that you have to class on Monday. If you forget, I will have a Vanilla Ice CD and some jank headphones for you to use.
2.Create an image by combining and manipulating 2 or more images. Create three new, compelling works this way. Upload them to Flickr and add them to your Urban Landscape Edited set so that they will be included in the slideshow on your blog.
3. Put a link to your Flickr site on your blog!!
3. Make a new blog postings. Keep it inline with the theme of your blog.
Next week - Intro to digital music
Introduce color correction in Pixlr using Levels
BUGGY STILL!
Introduce idea of cloud computing/storage
Google Drive access from within Pixlr
Introduce Flickrslideshow
Embed a Flickr Slideshow into your blog featuring your edited Urban Landscape images
Animoto
Working with layers in Pixlr
**To save your file so that it preserves layers, you must save it as a PXD file**
Homework:
1. Bring a CD and the best headphones that you have to class on Monday. If you forget, I will have a Vanilla Ice CD and some jank headphones for you to use.
2.Create an image by combining and manipulating 2 or more images. Create three new, compelling works this way. Upload them to Flickr and add them to your Urban Landscape Edited set so that they will be included in the slideshow on your blog.
3. Put a link to your Flickr site on your blog!!
3. Make a new blog postings. Keep it inline with the theme of your blog.
Next week - Intro to digital music
Tuesday, September 4, 2012
Urban Landscape assignment for Labor Day weekend
Homework for Labor Day weekend.
Take as many photos as needed to get 15 photos on the theme of Urban Landscape that you are happy with.
Post those to Flickr. Put them in a set titled Urban Landscape Unedited.
Edit the images using the Levels tool in Pixlr.
Save the edited photos back to Pixlr. Put them in a set titled Urban Landscape Edited.
Subscribe to:
Comments (Atom)